Pages

Thursday, July 28, 2011

Chicken Wire Frame & Momma is OVER THE HILL!

I am up so late! It's 11:45 at night right now and I'm waiting for my hubby to get home from the airport with his momma. She flew into town to go to Disneyland with us tomorrow! My mom is coming as well...which means Paul and I will get to ride adult rides for like the first time since we've had kids! I can't wait! I'm so excited I feel like a kid myself! Anyways...yesterday my momma turned 50! OVER THE HILL! I say that because it makes her mad...haha, but not in a bad way mad, it's my way of joking with her! She had been telling me she wanted another magnet board to hang up all of the pictures I give her of the kiddies (I LOVE having family pics done! I'd do em' every month if I could...haha!). I decided to try make one of those chicken wire frames instead that I have been seeing all over bloggie land!

Here's what you need to make it:
-Picture frame, just the frame (or you could save the backing and cover it with fabric, that would be cute too!)
-Chicken Wire, I bought a 10ft roll at Lowes for $3.50 ish
-Spray Paint
-Staple Gun & Staples

First:
Spray your frame with your spray paint, I used Valspar Satin Finish. I liked the color!
Second:
Once dry, roll out your chicken wire and staple it into place. The excess amount I just twisted in out of fear of cutting wrong pieces and it all comes unraveled!
Third:
Fill it with cute stuff! Before I gave it to my mom I put some random bows to show that this could be a hair bow holder as well as a picture holder!


Then to give it to my mom I redecorated it...she's not into hair clippies with flowers so she probably wouldn't like it how I first had it...plus I don't think Hannity or I want to part with some of those flowers....well me anyways, Hannity quit wearing bows at about 7 months old...it was seriously the saddest day ever for me! Still everyday (She's almost 14 months now) I put a headband on her in hopes she will want to wear it but no luck! I cut out a 50 with my cricut, she said she was taking that off! Haha!
I just used little clothespins for hanging! On some of them I added embellishments. This is my favorite one! The flower is from Stampin' up. I bought the package for making earrings, and had some left.
Here it is finished! We got her a $50 Downeast gift card, a dollar for every year!
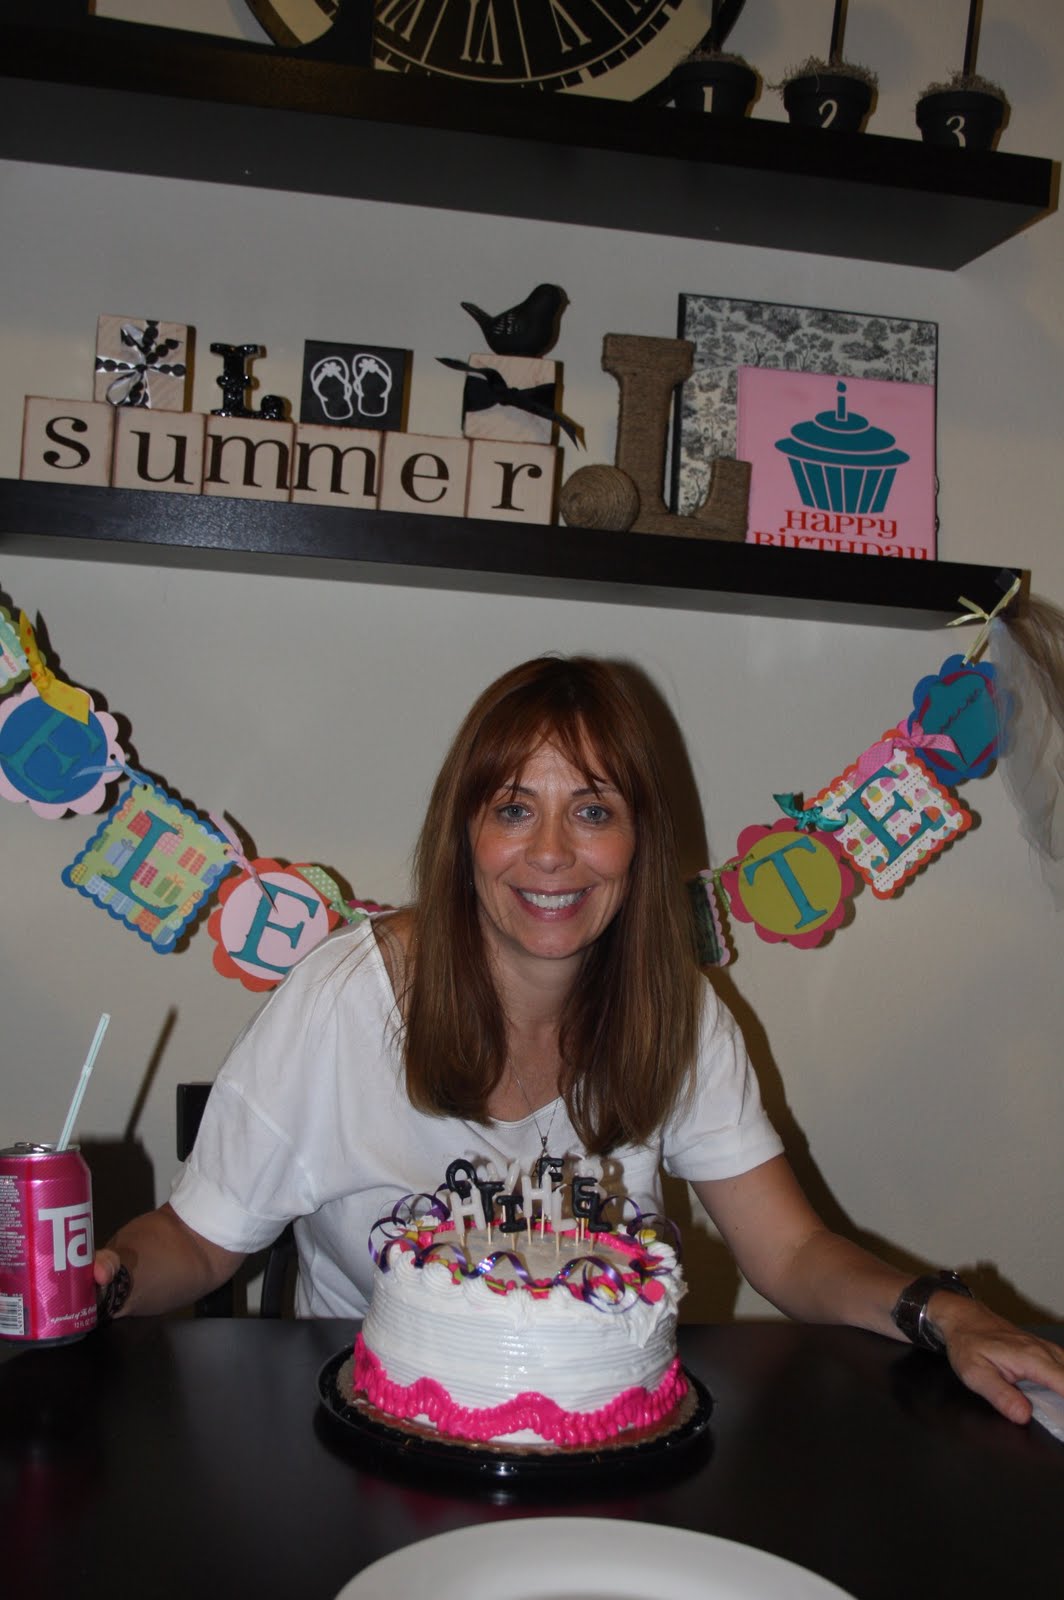
Here is my momma! She's pretty great! And she's always guaranteed to have a Tab in her hand...yes they still make that stuff! Haha! Happy Birthday momma! We had her over for dinner then my hubby stayed home and watched the kiddos while we went to the movies and saw Horrible Bosses. That movie was pretty funny, but WARNING: LOTS OF SWEARING! We did laugh so hard though and I almost had a straight up laugh attack on one scene...it was pretty hard to get myself to quit laughing!
After the movie I came home and found out that my hubby got both kids to bed by 8:30...what the heck!? Landon NEVER falls asleep that easy for me! Hannity does...she is the BEST sleeper ever! It was a good thing though because Paul had to study! He is taking Step 2 of his board exams next week! We are really hoping for him to get the Orthopedic Residency, so we need him to do AMAZING on this test! 1 week left to study! We are both so nervous! Wish him/us luck! Anyways, I still have so may posts to catch up on! Hawaii Trip, London/Paris Trip, Michigan Trip, now Disneyland trip, plus many other daily events and tutorials! Stay tuned!

Monday, July 25, 2011

Signage

Hey! This is a quick post! I have had a busy day today! I went to Old Navy, the gym, lunch, and the park! I'm exhausted, it's so HOT out!!! The kiddos had lots of fun though, but after all of that neither of them fell asleep! What's up with that?! Anyways I just thought I'd post a few pictures of some signs that were recently ordered!


Now I'm off to shower, at like 3:30 in the afternoon! Haha! Then I'm doing some vinyl for a Super Saturday that's this Saturday! Fun fun! Maybe I'll print a few things for myself too!

Saturday, July 23, 2011

Outdoor Toy Storage

A few weeks back I decided that I could no longer handle the toys scattered all over our back yard. There aren't many (my back yard is like smaller than my living room!), but I needed a solution! I went to target and saw this bucket on clearance for $5....and it was black! Score! I took it home and slapped some vinyl on it! Now it's super cute...to me anyways! I wasn't patient though when I applied the vinyl so it bubbled a little...oh well!

Friday, July 22, 2011

Seasonal Subway Art

Sorry it's been a while since I've updated! I was out of town...again! It has been the summer of travels for us around here! Hawaii, London, Paris, Michigan, and we are headed off to Disneyland next weekend! I still need to post pictures from all of those trips! I'm a slacker! Anyways, a few weeks ago my good friend Celeste came over and she and I made some really cute double sided seasonal subway art.

These are 12x12 boards, I have a huge stash of these in the garage that my hubby cut for me! Spring and Summer share one board and Fall and Winter share the other. I have been wanting to make the seasonal subway art for forever now and I'm so glad I finally cut the vinyl and painted the boards for it! I love how they are double sided too! Less stuff to store! I put a coat of mod podge over the top to protect the sign from getting scuffed while up on an easel!
Close up of the Spring and Autumn.
Here's the Summer and Winter ones! I love the lettering on the word Summer!
Close up of the Summer and Winter.
If you'd like to purchase these made it's $50 which is a great deal! It's normally $20 for one board! If you'd like the kit to make this subway art it's $35, which is also a steal of a deal because I normally sell the vinyl alone for $12 per Season! These are so cute for any home and of course can be customized to match your home! Send me and email,text or facebook message if you are interested!


Monday, July 11, 2011

Quick Picture Frames

They other day I was crafting up a storm working on vinyl orders. While I was painting boards and blocks I decided to paint some boards for me too!

This space is a little bare for me....I like LOTS of decor, I'm not clean and simple when it comes to decor. Maybe if I had way more space it would be a different story, but I don't so it's not! I knew I wanted to put 12x12 picture frames in this blank space, but 12x12 frames are kind of hard to find. Then I was soooo excited when I saw the quickest frame idea on one of my favorite blogs Shanty 2 Chic. When I saw these I knew right away that I was making them! They were so simple to make & cheap!
Here they are! All I had to do was paint the boards black. My husband did the rest! Haha! He nailed in the picture holders, the wall hangers, and hung them up for me!

I just LOVE these pictures of my kiddos!
The colors we were wearing are the exact colors I was trying to add into our home!
Here's my hubby being a great sport! He took time out from studying to help me out!
Here it is...much better! Although I am doing a big change to this display...I just haven't finished making everything yet! So excited for that!


Thursday, July 7, 2011

Vintage Circus Baby Shower

A few months back I helped throw a baby shower for a friend of mine. By help I mean, I didn't do much...just made a few items! My friends friend Jen did most of the hard work in putting this shower together. I thought it turned out to be pretty dang cute! The theme was Vintage Circus.
These were the invitations designed by SHEPAPERIE. Aren't they darling???
Here is the front table that the guest saw when they arrived. I made the step right up sign and the banner, as well as the white chocolate covered popcorn that was in the circus baggies! The little book was for people to write advise for juggling 3 kiddos. I love the tickets coming out of the vase.
Here's a close up of the sign and the other table decor.
There were maternity pictures all around for everyone to see.

This was the centerpiece for the food table. It's styrofoam wrapped in tickets, who would have thought?!
This topper was perfect!
Here are the cupcakes. The wrappers and stickers used to make the toppers were from Michael's.
Here is some of the dessert table, with all of the yummies you would find at the circus.
Some old fashioned taffy....yummy!
Here is how the water bottles were covered and the cute invite was on display as well.
Here is the whole dessert table! In the popcorn bins are pom pom tissues made to look like popcorn.
These little baggies had some very tasty chips in them! And some yummy fruit juice sodas!
The silverware was wrapped in tickets, how cute! The salad was served in these little cups that were wrapped with bakers twine and held together with a little sticker.
Here is the mommy opening gifts. I had to take a picture of this gift because Landon has this train and I never could figure out how to get it together in the right way...lol
I loved this theme so much I may be doing my sons next birthday party with the vintage circus theme and add some fun carnival games!

Tuesday, July 5, 2011

The Giveaway Winner

And the winner of the Seasonal Blocks giveaway is:

Mikal Norman
Congrats!

Post a comment, or message me letting me know what colors you would like! Thanks to all who entered and stay tuned for more giveaways and crafting goodness!